Sunday 26 April 2015

Excuses, excuses

I am blaming 5am.

Yep, I am pretty much seeing 5am every morning lately and once there's a wash in the machine and I've had a quick flick through my IG feed, I have been a bit at a loss as to what I can do with the time that won't waken the rest of the house.


Enter the Moda Modern Building Blocks Pattern and the quiet activities of pressing fabrics and cutting for blocks.
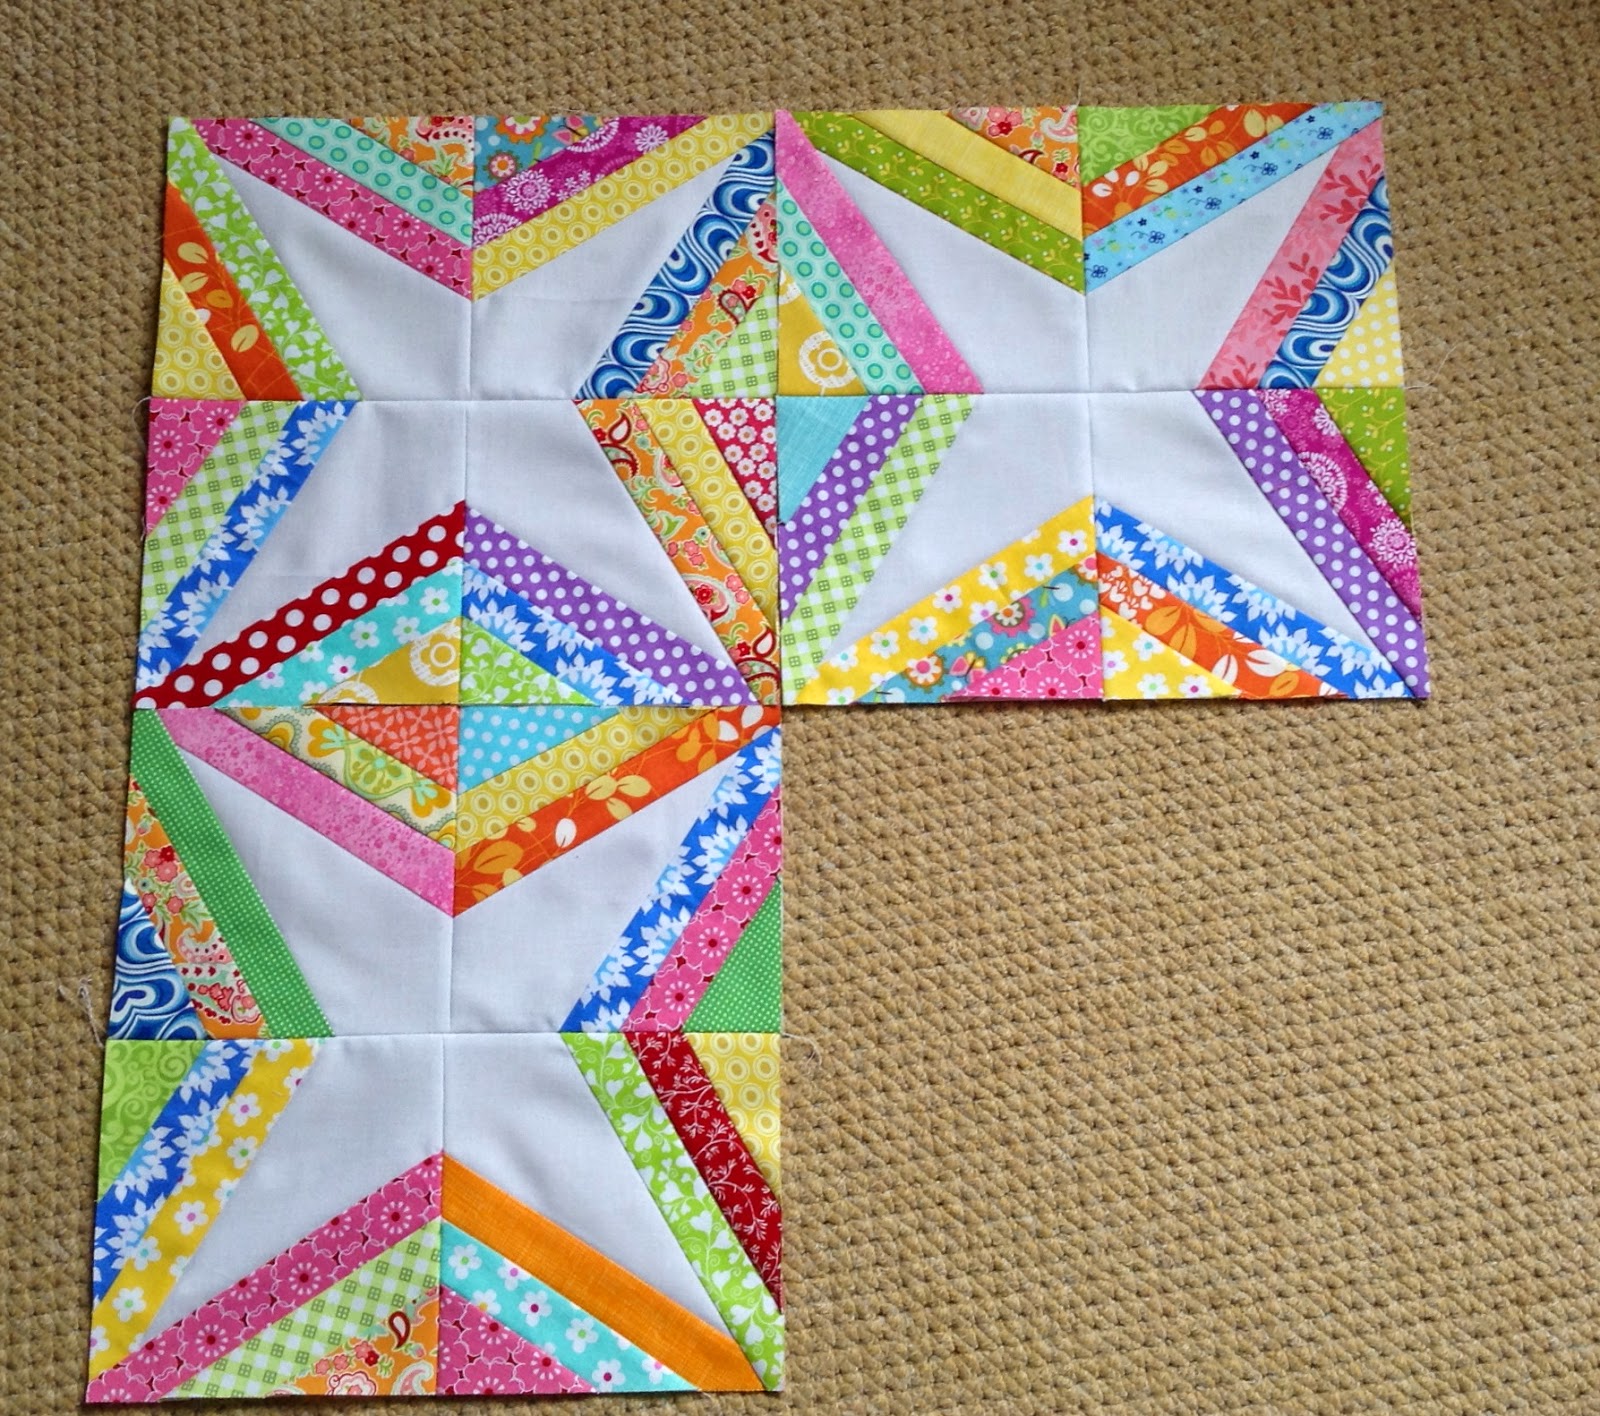
Block 1
Excuse no 1 - Okay, I know I'm supposed to be focussing on sorting and packing away my sewing space, clearing ongoing projects and really not starting new things, but I kind of just couldn't help myself when there's not much else I can do between 5 and 7am every morning and my brain is simply not up to counting crochet stitches that early.

Excuse no 2 - I ordered this pattern while I was staying with Di last October (when I saw her copy I knew I wanted to have a go) and I even declared it as the quilt I was most hoping to make in 2015. So, really I should try and make a start, shouldn't I?

Excuse no 3 - If I have some blocks already cut and ready to stitch won't it give me a better focus and maximise my sewing time once I make the time and effort to haul the sewing machine and equipment down to the kitchen since it won't just be sitting ready to use any more?

Say "yes" - I'm pregnant and hormonal and you don't want to argue with me!


My very early morning cutting activities have generated the majority of the cutting for blocks 1 - 9 so far.  These blocks are the largest in the quilt pattern (ranging from 36" sq to 18" sq)  and I decided after trying to cut block 1 that I should probably tackle all of the larger block cuts first.

As you can see in the picture of block 1 above not all of the pieces have been cut.  I ran out of fabrics.  I think I underestimated the size of this block (36" square) and just how large the original fabric would have to be to successfully achieve the instructed cuts.  Ultimately, unless you have a very generous cut on your half metres or fat quarters you won't be able to cut the 19.5" squares that go into making up this first and several other of the larger blocks.  So, knowing I'd need to order a little more fabric to finish the block I thought it would be wise to go ahead and cut as much as possible for the remaining large blocks just to work out if I need to order a little of anything more.  Sure enough, my existing fabric didn't strecth to all of the larger cuts so I have a few extras to add to my order.  Oh how sad to have more Bonnie and Camille lovelies winging their way to me!!

After blocks 1 - 9 the remaining 39 blocks are all either 12" sq or 6" sq so I think the rest of my B&C stash and scraps should be able to provide amply for the more "normal" cuts required.

All in all, I know I'm breaking my own rules starting another project at this time, but maybe having things prepped will inspire me to keep at it and not give up on the sewing machine post-baby and really, it is always fun to start something new!!  I'm also fairly certain that some of these will be pieced at the next available opportunity, just because "my name is Sarah and I'm a stitchaholic".

Think I have now suitably justified this new start to myself ;-)


Thursday 23 April 2015

Impromptu Crafty Button Heart Picture


I found an Ikea picture frame when I was tidying up a section of the sewing room recently and decided on the spot that it needed to be put to use rather than just being re-stored in my grand relocation project.

I tracked down a little packet of heart shaped Mother of Pearl buttons that I had ordered from ebay for some long-forgotten purpose and decided they would look nice laid out in a heart teamed with some of that beautiful strip of linen offcut I have used for a few pouches lately.


I set to work lacing the linen over a piece of acid free mount board.  As you can see, the linen strip isn't quite big enough to fold over the backing card in both directions or I would have laced it vertically and horizontally.  But, it is big enough to hide behind the aperture mount so I think it will be ok, especially as this is no heirloom project, just a quick crafty make.


Then, I popped the aperture mount over the linen and laid out the buttons as I would want them to be.  I drew around a heart template onto the linen with my Chaco chalk pen first to provide a vague outline to work to.


Next, it got messy as I tried to glue the buttons to the fabric trying not destroy the visible linen with great big glue streaks.  Unfortunately, I lost some of the nice shaping of my original button layout doing battle with gluey fingers and trying to keep everything else clean, but it's only a quick project for our home not a gift or a masterpiece!


When the glue had dried and I had picked off the excess that managed to get on to the tops of the buttons (ahem) I simply put it all back in the frame and hung it on our bedroom wall.   I can't show you a pic of it there though as it reflects too much light and doesn't photograph well.  That's why this pic is taken at a funny angle - I was trying to avoid light reflections and this was the best I could do.

Eh voila! Something less to store and hoarded supplies put to a fun use!

Monday 20 April 2015

Final focus

So, it seems that writing my little focus lists in January and again at the beginning of March has paid off and I am getting a good handle on the UFOs and WIPs hanging around my soon(ish) to be dismantled sewing room.

Since my March re-focus list I have managed to keep up to date with the Quilt Now Magazine BOM blocks, finished the Rainbow Crumb quilt, my Modern Stitching Bee Quilt and made two lovely bags - a Sidekick tote and a QAYG tote in my favourite fabrics.  I even found time for a few other small makes too.  All of that means that I have cleared all but two of my WIPs and the longer term UFOs are no more! I think that's a good position to be in considering that I really need to start thinking about getting the sewing room packed away and I really don't want lots of unfinished projects languishing where I cannot access them or while I don't have time to work on them.

So, what's left to focus on?


Well, the Quilt Now BOM is still ongoing for the next 3 issues, I think.  I'm hoping that at least two of those months will be possible for me and that I might even just about squeeze in the last one.  It would be sooooo good to get it all pieced before I have to take a break from my machine.  Fingers crossed.


My other remaining WIP is my crocheted hexies.  This one has always been a long term WIP (it is a little bigger than the photo above now) and I am not too concerned about its rate of progress, but it will be a nice project to pick up and keep on the go.


After that, I've got a sewing room to dismantle and LOTS of boxes to relocate.  I think it will take me quite a while to make this lot manageable in a new space!

Then,  I think it will be time to give some thought to my stitching options for the second half of the year.  I know there's a new arrival coming to pre-occupy most of my "spare moments" but I would like to keep stitching somehow, even a little bit here and there.  I'm thinking that hand stitching projects will probably be the way to go for a while. So, maybe a little prep from some new handstitching/knitting/crochet projects would help that actually be possible.  Need to have a think on that one.

So that's it.  In a nutshell, my new focus is on keeping my two current WIPs from becoming UFOs, tidying away a sewing room and preparing some post-baby stitching/sanity plans.  Probably not many finishes in there but hey, it's a plan!


Saturday 18 April 2015

Quilt Now BOM - Issue 10


Time for the next instalment of Quilt Now Mystery Block of the Month blocks.  Hard to believe it's issue 10 already!  Reene's skillbuilder this month was to have us make little gathered hexagon blocks.  It started off with my sewing table covered in these strange little hexie bug thingies.


It finished with little blocks like this one. Sort of puffy, gathered hexagons which are machine appliqued to my low volume background blocks.


Eight blocks made and waiting for Issue 13 as instructed (I think that maybe the last one of this BOM).  Wonder what Reene and Quilt Now have in store for Issues 11 and 12 then?


Thursday 16 April 2015

Embroidered Mini-Quilt


Part of my Easter stitching plans included this little embroidered mini quilt for a space on our bedroom wall.   In spite of getting distracted by the lovely sunshine we had last week, I did manage to finish up the embroidery last weekend and add a backing, binding and a couple of hanging tabs to allow me to finally get something on that wall!  You can see it in situ above.


 And, here's a closer look at the finish


and while it was in progress.

It was nice to have a wee bit of embroidery on the go again last week.  I think I am beginning to slow down and consequently am enjoying the more relaxed pace of hand-stitching.  I foresee more of it than I do of machine stitching over the next few months, and probably after that too!


Tuesday 14 April 2015

Modern Stitching Bee - a finish

Scraptastic Tuesday


Last year I was part of the Modern Stitching Bee with some truly lovely Bees and some fun blocks being set every month.  In July, my Queen Bee request was to have the other Bees make "That block" blocks for me a la Mary's tutorial (but re-sized a bit to finish at 12.5" square).  The blocks are a fantastic way to use up your scrappy leftover strips of fabric, and those of your Bee mates too!


A little like a spider's web block, "that block" uses lots of scrappy strips added around a centre (usually a solid).  In my experience of both blocks, however, the "that block" is the one I most prefer to make.  It definitely did not feel as difficult to construct as a spider's web block, and I also have a personal preference for the secondary pattern being a diamond, rather than the web effect.  Everybody will feel differently, but I at least hope that my Bee mates didn't hate me for setting this block.


They did me proud sending in all their blocks in the colour scheme I had requested (pretty much scrappy, bright and summery).  In fact, I loved it so much after I had it all laid out on my living room floor that in spite of having resolved only to piece it into a top until after the baby arrives, I just couldn't wait to finish it.


Now, as you can see it is a fully fledged quilt!  I chose to quilt in wavy lines mainly because I was impatient to get on and because the straight line design options I was mulling over would take me through those seams where many layers of fabric had come together and I feared that might get a bit bumpy instead of staying straight.

Have to say, I really love the waves and am pleased that I just went for them.  Finished off with a scrappy binding I already know this quilt will be much used in my home.  I love that it is such a happy quilt.  I love that my Bee friends contributed to it.  I love that it has such a greater scrappy variety in the fabrics than I could have achieved by myself.  I love that it looks just like I hoped it would way back when I was choosing my block to set in MSB.  And, I love that it is finished and snuggle worthy!

I am linking up this scrappy strippy quilt with Leanne and Nicky today for Scraptastic Tuesday even if the scraps used were not all my own.  BTW two of the pretty blocks in my quilt were contributed by Leanne herself!

Lastly, I want to reiterate my thanks to the lovely Modern Stitching Bees for making me such a beautiful set of blocks and for including many precious fabrics in there.  Thank you all so much!!


Sunday 12 April 2015

Perfect Quilted Tote

I"ve been wanting a tote bag big enough to take my laptop to work for so long.  I really should have gotten around to making it before now, but it kept falling down the list while I thought about what pattern? what fabrics? just how big?

Front

I saw Di's wide tote when we met up for a day in York last summer and knew that it was about the perfect size.  Her bag was made from the Elizabeth Hartman Perfect Pleated Tote pattern.  In the end I decided to go with the tall tote version so I can sling it over my shoulder and it is a perfect fit for the Macbook Air I use at the office.


Back

Of course, it's way too pretty to use only for work so I'm quite sure it will get plenty of other outings too!  I chose to work up the QAYG panels from my Bonnie & Camille scraps and paired them with some Essex Linen in denim.  I just love the combo!


If you are looking for a pattern for a QAYG tote this is another good one to choose.  Although the instructions are in what seems like a rather overwhelming 80 steps, each step is detailed and very well explained and importantly, supported by photos you can helpfully refer to.  The double pocketed lining in the pic above was a cinch to whip up with such clear instructions.

My only area for concern is the topstitching on the very top seam of the bag.   With the placement of the magnetic snap so high on the facing, it was almost impossible for me to get a good line around the snap with my machine and if I were to show you, you'd see a very jagged and wonky topstitched seam.  It kind of bugs me, to be honest, but since the stitches blended in quite well to the textured weave of the Essex linen I don't think anyone else will notice.  Might have been quite different if I'd used another solid to add the contrast to the QAYG.  Next time, I think I would fit the magnetic snap lower down on the lining fabric instead to avoid this issue.  Other than that it was a great pattern with nice easy steps to follow.

So, that's my second bag done and dusted.  Thanks for the inspiration of your gorgeous version Di.


Monday 6 April 2015

Hopeful beginnings


There's a wall space in our bedroom that I have been threatening to make a mini-quilt for for a considerable time (maybe three years).  But, somehow, I have always had more urgent projects on my make list.  So the space is still waiting.


On my quest to clear as much of my sewing list as possible and to use up rather than have to store supplies once relocated from my sewing room, I decided that it's time to get on with the mini-quilt for the wall.

So,  I prepped a bordered centre with some of my Bonnie and Camille fabrics for an embroidery design.


Then, after a little play with some word processing fonts, I arranged the little design in my head on to paper and transferred it to the fabric ready for a little perle action over my Easter break from work.

It's the first stanza of an Emily Dickinson poem -

Hope is the thing with feathers
That perches in the soul
And sings the tune without the words
And never stops - at all.

Gotta get busy now!

Saturday 4 April 2015

Double Doorstops


These little doorstops are the last of my trio of double makes for our new arrival.  Along with small quilts and the basket liners for baby changing needs, I wanted to make door stops in both boy and girl options.  I used some wee scrappy leftovers from the quilts for the central 9 patch and matched the boy fabrics with some denim and the girl fabrics with some of the home dec linen-type fabric I used in my Sidekick Tote.

The pattern is an Oh Fransson tutorial from a long time ago which I have always intended to make for our spare room, which then became my sewing room and will soon become the baby's room.  Sadly, the tutorial doesn't seem to be available on Elizabeth's blog any longer so I can't link there for you.


For as long as we have lived here this door swings open.  No matter how we have adjusted the hinges or tried to fix it we haven't had any success.   As you can see it has been propped open for a very long time by an unfinished cross stitch which has been dust protected in a pillow case.  Very glamorous!


I think you'll agree that these little pretties will do the job much more nicely.

So that completes the double makes I wanted to have ready for my new arrival so that he or she will have a few handmades by mum!


Related Posts Plugin for WordPress, Blogger...