Monday 29 February 2016

Dear Jane: G-8


I forgot to take a picture of my Dear Jane block G-8 which is a Le Moyne Star (farthest right on the photo).  This one pieced nicely and joins my first two blocks in a little centre strip now.  The fabric has very sweet little see-sawing birdies on it.  See?


I think my next blocks will be the three that sit above these.  The centre one will be green in keeping with my around the world colour scheme but the outers will be a new colour - which to choose?  I have so many pretty fabrics for this quilt it's going to be fun deciding!


Friday 26 February 2016

Moda Modern Building Blocks - Blocks 27, 28, 29 and 30

Crawling along with my Moda Modern Building Blocks.  These 6" blocks seem to be going on forever (sorry if you feel that way too about my sharing).

So, here are my recently finished blocks -


 Block 27 was straightforward - bish, bash, bosh and done!


I may have put off block 28 on a number of occasions - just couldn't face those wee HSTs and it looked like there are so many of them.  Of course, there aren't really and while I didn't especially enjoy stitching it, I do like the finished article.


Block 29 had more weeny HSTs but not quite so many of them and honestly, it's not quite as wonky as the picture makes it look.  Better seam pressing will make it sit more squarely.


I must admit it was nice that block 30 started with a pinwheel centre and not an economy square.  So many of the blocks in this quilt pattern seem to be based on the economy square centre (and there are more to come).  I'm also a little unsure if the pattern is as distinct as it should be with my red fabrics blending a little more with the red flowers on the main pink fabric than I had expected.  Contrast may be a little bit lost perhaps.  Hmmm...

So, 30 blocks stitched and 18 more to go.  Really?  Can there still be that many? ;-)


Monday 22 February 2016

Scrap Box Block 3

Today is the last of my quick blocks from your scrap box tutorials.  Remember, these are just simple, fun blocks to help you put your scraps to good use and maybe even for a good cause like Siblings Together.


This block is a little more involved than the others but is essentially constructed from four similar quadrants just in reversed colour ways.  This block is great for making use of your scrappy 3.5" squares and 2" strips.  I mixed mine with some white solid to make my blocks but using scraps of low volume in place of the solid would be fabulous!  Let's get on with this tutorial then.

Scrappy Window Frames Block

Using scant 0.25" seams throughout this block will measure 12.5" square unfinished.

You will need to cut:

from mixed coloured scraps
Cut 2:  3.5" squares
Cut 2:  2" x 3.5"
Cut 2:  2" x 6.5"

from background fabric
Cut 2:  3.5" squares
Cut 2:  2" x 3.5"
Cut 2:  2" x 6.5"


Arrange your fabrics in four quadrants as shown in the photo above.  We are going to stitch each quadrant together in exactly the same way.

A little word of caution:  if you chose a directional print fro the 3.5" squares that are the centre of two of the quadrants, turn the directional print so that it lies horizontally as you construct the quadrant.  I didn't turn mine (the red one) as you can see in the photo above, so when the block construction was complete my print wasn't lying correctly because the white framed quadrants get turned for final assembly.  Oops!  Anyway, hope that makes sense.


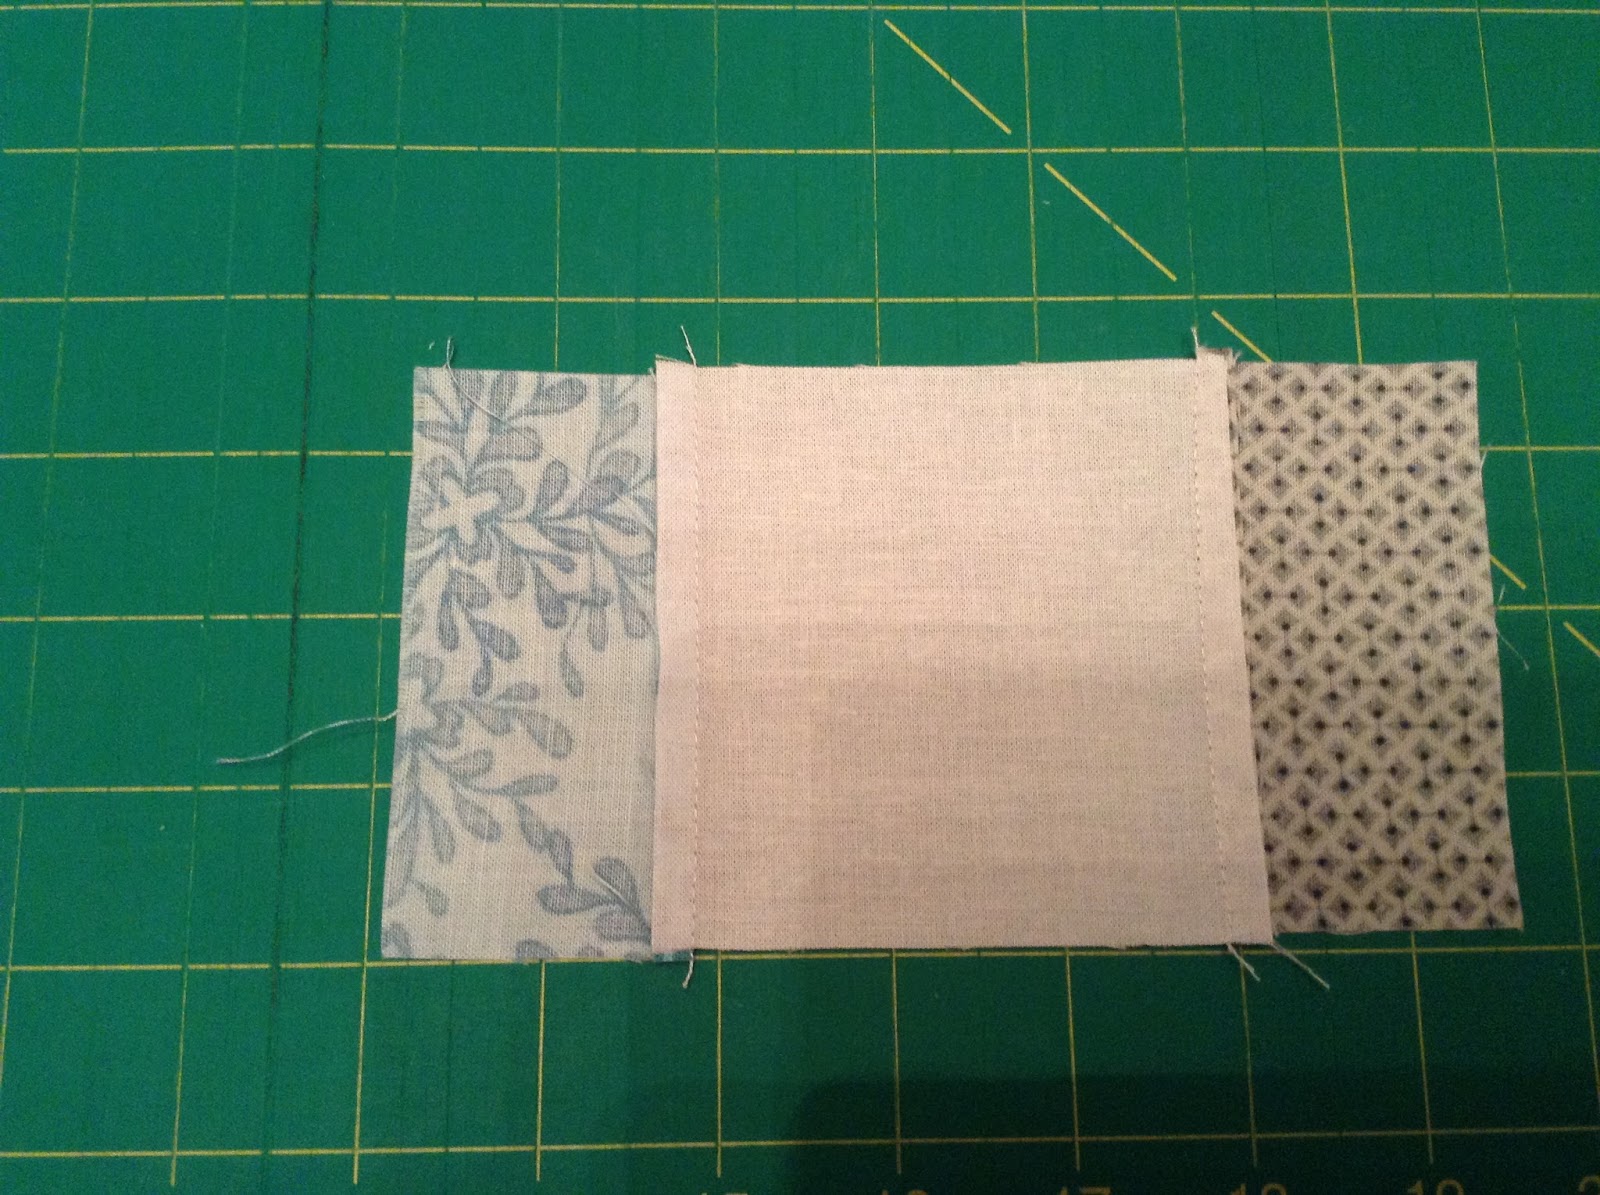
So, having the pieces of each quadrant laid out as above, first stitch on the two side pieces to your centre square.


Press seams away from the centre. (Sorry I had to swap quadrant pics because some were blurry.)


Now stitch the top and bottom pieces on, again pressing the seams away from the centre.  Then trim your quadrant to 6.5" square.

Repeat for the other three quadrants.


After that, it's as easy laying out your quadrants in the order you want them to be.  To make the seam alignments easier the white square centred quadrants should have the longest strips to the top and bottom in the block placement while the print square centred quadrants should have the longest strips to the sides.  Look carefully at my photo and hopefully it'll be clear.


Next stitch the two top quadrants together and then the bottom two quadrants together so that you have two rows.  Press your joining seams in opposite directions.

Then pin and stitch the two rows together, carefully nesting your centre seams, and then pressing your final seam open.


If necessary, trim the block to 12.5" square. Stand back and admire your fun scrappy window frames block.


So, now that I've covered all three of my Scrap Box blocks with tutorials, which ones are you going to use to make a funky quilt for children who have been separated from their siblings by the UK care system?  Siblings Together could really use your help to provide quilts for this summer's camps.  Please, please consider helping out.


  • Make a quick quilt yourself.  
  • Get together with your stitching besties and have a Siblings Together quilting Saturday (or two). 
  • Canvas support on IG or on your blog for block donations to help you put a quilt together more quickly.  
  • Ask your online Bee mates to make you these blocks for your quilt this year with a view to making and donating it.  


There are all sorts of ways of doing this and I promise you, it will do your heart good to know that kids out there have a little comfort as they remember the precious times they spent with their sibling this summer at camp.  Go on!  Please ...

If this isn't the block for you, check out Block 1 here and Block 2 here.  I hope one of them will grab you and get you motivated.

Although I am promoting my blocks to encourage Siblings Together contributions, I am very happy for anyone to reference these scrap box block tutorials or indeed any of my block tutorials for use in your Charity Bees or even just your ordinary Bee groups.

Have fun stitching and if you do use any of the tutorials, please share pictures of them with me either here or on Instagram #sewmesarah


Saturday 20 February 2016

Dear Jane: G-6


After piecing this tiddly sawtooth star centre for my second Dear Jane block, I hit a bit of a wall in progressing.  I know!  It's only my second block and already I'm having problems.  Essentially, that 1" sawtooth star is a mass of seams of the back side that make the little block super bulky and when I tried adding the next pieces by EPP, the result was a hideous skewed mess.  I didn't take a photo and almost threw the whole thing away and started over.


Anyway, huge procrastination followed as I tried to decide what to do.  Finally, I opted to machine piece the next round on to the star which allowed me to get a much neater, firmer and flatter finish on those seams to make the pentagon.  It's probably an obvious solution, but I was reluctant, I think, because originally I had wanted to EPP this quilt in its entirety. Now, two blocks in I've already introduced machine quilting in both to solve my EPP hiccups.


So, it seems my Dear Jane quilt will be a combination of what works and really, that's ok as long as it doesn't look strange. There is no hurry but I would like to keep progressing rather than getting stuck and never moving forward for want of a little machine fix.


Here are my first two blocks now joined.  By no means perfect, but I'm happy with them and loving these fabrics.  Onwards to a Lemoyne Star for my third block, with thankfully much bigger star pieces :-)

Monday 15 February 2016

Scrap Box Block 2

I'm back today with a second tutorial for a block that will help you reduce your scrap boxes and make a funky, colourful quilt for a charity like Siblings Together.


The pic above shows two of the scrappy colour block rail fence blocks that this tutorial makes.  Again, no rocket science involved but it's all here for you if you fancy having a go.  This quilt was the inspiration for these blocks.  You need to have a wee peek just to see.

Anyway, while the inspiration quilt is all nice and regular sized pieces, I really wanted to crack into my store of scrappy strips of all widths and I imagine this would help a lot of you reduce your scrap mountains too!  So, for this block I worked in quadrants of single colour ways and strips of varying widths.  Go get yours and join me (and forgive for the terrible lighting in my tutorial pics).

Scrappy Colour Block Rail Fence Block

This will yield an unfinished block measuring 12.5" x 12.5" and uses scant 0.25" seams throughout.

You will need 6.5" lengths of scrappy strips in four different colour ways.


For each quadrant of your block take a number of 6.5" scraps in one colour and stitch them together along the longest side.  You will need enough strips so that your finished quadrant can be trimmed measure 6.5" square.  Just a tip: don't make the outer strips too narrow or you may lose them in your seam allowances.


Handy hint: This block will come together very quickly if you chain piece your strips in colour pairs.


Once your strips are pieced in each colour block, press the seams all in the same direction.


Then, trim each colour block to 6.5" square.


When you have all four 6.5" colour blocks made.  Lay them out as above, alternating the horizontal and vertical direction of the strips.


Stitch the top two quadrants together and then stitch the bottom two together and press the joining seams in opposite directions.


Pin the top row and bottom row together, nesting the seams that you pressed in opposite directions neatly.  Stitch together and press your centre seam open.


Now that you have all four colour block quadrants together all that remains is to trim the block to 12.5" square before you start on a second one! ;-)

Remember, this little tutorial is just to show you how easy it would be to make a fun quilt from your scraps for a very worthy cause.

My first scrap box block can be found here if you are interested.  As always, I am very happy for anyone to reference these scrap box block tutorials or indeed any of my block tutorials for use in your Charity Bees or even just your ordinary Bee groups.

There will be another block along soon, so keep reading!
Block 3 is now published here.

Thursday 11 February 2016

Happy Days BoM - Month 1


And we're off!  The new Sarah Fielke BoM, Happy Days, got off to a start at the very end of January when subscribers like me received our first month's instructions.

I'm not quite finished all that is required this month but I've made good inroads.


I started with LOTS of cutting prep for the many little stars that will be included throughout the quilt.  Sarah hasn't set them all for this month, of course.  Phew!  They can be made as takes our fancy during the first nine months.


After all that cutting I've made three little stars so far.  I am going to work with low volume and palest grey backgrounds in this quilt and want all of these stars to have palest grey settings.  I think they will work quite nicely.


Of course, I was itching to get at the big block set this month.  Known as block 14 it pieced together beautifully and I had lots of fun deciding which of my fabrics to make this first of the big blocks from.


As a little bonus freebie, Sarah sent her BoM subscribers instructions for making a block book.  The idea here is that you have a kind of album in which to hold all the blocks-in-progress.  I wasn't going to make one, but then fancied playing with some blocks and you know how it goes... Next thing there's a block book in progress ;-) I'm adding these blue and orange blocks to some gorgeous orange background, but I'll show you when it's all finished.

With a wee Sunday afternoon sewing before the end of February, perhaps I'll be able to officially be up to date with my BoM for this first month.  That would be good going, wouldn't it?

Are you BoM-ing with Sarah?

Tuesday 9 February 2016

Cutting it fine


I was cutting it fine last week trying to finish up a crocheted shawl for a birthday pressie.  I honestly didn't think I'd make it but on Thursday night I was sewing in the yarn ends and wrapping and packing for an early trip to the Post Office on Friday.  Then it was up to first class mail to do its bit while I crossed my fingers.


So now that it has been received I can show you this Elise Shawl.  I found the free pattern on Ravelry.  It crocheted up a treat and overall really wouldn't take you too long if you remained focussed.  Unfortunately, I didn't.  Hence the 'cutting it fine', in spite of having started in plenty of time really.

This shawl is only little, making a neck scarf size, but you could easily just keep the pattern going with no need to recalculate the written instructions, other than the need for a little more yarn if you wanted a larger shawl.


When I had finished the stitches I admit that I was worried that I ought to have gone a few rows more to make it bigger but then I blocked it and that was like magic.  Truly.  I was amazed how much bigger blocking it and opening out the stitch pattern made the whole piece.

I am certainly no pro at any of this (as the mistakes in the crochet will testify) but the mystery of blocking was debunked somewhere during my Christmas googling time.  All I did was soak the shawl in some lukewarm water with a tiny bit of mild detergent for 15 mins.  Then I squeezed out the water gently being careful not to wring the fibres. So, just squeeze, don't twist or pull.  After that I laid out a bath towel on the living room floor and pinned the shawl out as neatly as I could.  Next morning, the shawl was nice and dry and when I took the pins away it looked like a beautiful piece of lace which it most definitely hadn't when it came off the hook.  Hooray for blocking!

I would definitely recommend the Elise Shawl pattern if you fancy making a simple, pretty shawl.  One day I hope I'll get time to hook one up for myself, but for now I'm happy that my lovely friend liked her birthday present.


Sunday 7 February 2016

Moda Modern Building Blocks - Blocks 23, 24, 25 and 26

I have some more progress on my Moda Modern Building Blocks to show you.  Again these ones are all 6" square (finished).


Moda Modern Building Blocks - Block 23
I think the Moda pattern designers may have felt we deserved an easy block after number 22 and its 48 pieces (see my previous post on the MMBB) and this one is hardly patchwork at all.  One large HST and we're done.  Enjoyed using one of my last cuts of this pink Ruby floral print in this block.

Moda Modern Building Blocks - Block 24
 I didn't have any problems with Block 24 and love the contrast between the houndstooth pattern and the orange with its dots.  There is something very appealing about the clean simple lines of this block pattern, don't you think?

Moda Modern Building Blocks - Block 25
This multiple layer economy square block design for block 25 felt as if it was going together well, but for some reason I am going to lose several of those outer points.  I think part of the issue is that I don't know what size each of the "rounds" should be finishing.  That would have been a helpful inclusion in the pattern because then you would know whether you need to trim the inner "rounds" a little as you go.  Not sure if I should live with it or re-do it.  I know if I had more time then I would make it over.  Maybe I'll just make a note and see how I feel when all the blocks are made.

Moda Modern Building Blocks - Block 26
Block 26 is a sawtooth star.  Always love this block.   On the whole I've chosen my fabric in line with colours in the original quilt pattern (though I'm using prints rather than solids) but in the absence of many grey fabrics in my B&C stash I just hope I've made enough of a contrast in my fabric choices that the design isn't lost in the bigger quilt.

I've now officially passed the halfway point in terms of block numbers.  26 down, 22 to go.


Friday 5 February 2016

Scrap Box blocks


I've been brewing a plan for a while.  It involves delving into my carefully stored and pre-cut scrap boxes and doing something useful with them.  Since committing to a whole quilt myself for the Siblings Together charity just isn't possible this year, I thought I might cheerlead from the sides, encouraging all of you to raid your scrap boxes and make a simple scrappy quilt or two yourselves. 


With a trusty assistant at hand a few weekends ago, we got stuck into my scrap boxes and the three block designs in the top photo are what we came up with.  There's no rocket science in any of these blocks and I'm quite sure that all of you would be able to come with these by yourself.  However, on the off chance that you've been wondering what to do with your scraps or trying to think of a quilt for Siblings Together and would simply like someone to have done the cutting maths for you, I'm going to share tutorials for all three types of block here on the blog over the next few weeks.


Frame Box Block Tutorial


Today I'm going to share a tutorial for this block which is a 10.5" x 12.5" unfinished rectangle.  For these blocks I went straight to my box of 2.5" strips. Just a few cuts and a few seams resulted in these pretty framed box blocks.  These would be perfect if you have leftover jelly roll strips or lengths of unused 2.5" binding. So go on, hunt a few out and join in.


To start with you will need 3 different fabrics which are 2.5" wide.

Fabric A (centre rectangle)
Cut 1:  2.5" x 4.5"

Fabric B (first frame - a 2.5" x 22" strip will allow you all the cuts required)
Cut 2: 2.5" x 4.5"
Cut 2: 2.5" x 6.5"

Fabric C (outer frame - a 2.5" x 38" strip will allow you all the cuts required)
Cut 2: 2.5" x 8.5"
Cut 2: 2.5" x 10.5"


Layout your pieces as shown in the photo above.

Using scant 0.25" seams throughout, stitch the borders in place adding the side pieces first and then the top and bottom.


Press seams away from the centre.


Your outer border is added in exactly the same way - sides first, then top and bottom.  Neatly trim to 10.5" x 12.5".   After that, hey presto ...


you will have a great wee block for the start of your Siblings Together Quilt and you'll have done something useful with those scraps!!

I realise that this isn't the most detailed of tutorials, so please do ask if you need any clarification, but honestly it is that simple.

As a by the way, I am very happy for anyone to reference these scrap box block tutorials or indeed any of my block tutorials for use in your Charity Bees or even just your ordinary Bee groups.

Hope to be back soon with the next scrap box block tutorial for you.

Block 2 is now published here.
Block 3 is now published here.


Related Posts Plugin for WordPress, Blogger...